A healthy lifestyle is all about balance in our life. When body mind and soul are in perfect balance position then we achieve the best of health in all aspects. In this article we will explore Tree Pose Variations, meaning, steps, benefits and contraindications.
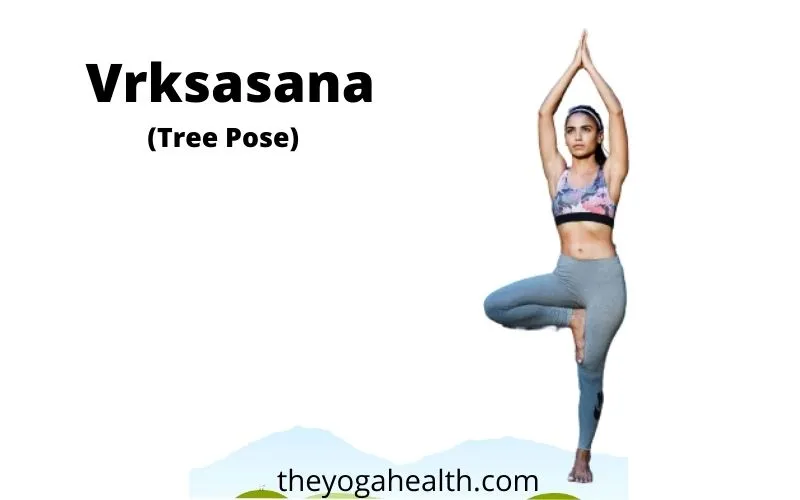
Vrksasana or Tree Pose is all about balancing your body on one foot, when the foot is placed on the thigh of the other leg. As per the Gheranda Samhita “Place your right foot at the top of your left thigh and stand on the ground like a tree, this is Vrksasana”.

Table of Contents
Tree Pose variations and meaning
In the Sanskrit language ‘Vrks’ means a ‘tree’. The tree is symbolically said to be strong and well grounded because it grows downwards as well as upwards with stability. In this pose, the foot on the ground represents the roots of a tree and the arms are considered as branches of the tree.
This is one of the basic standing poses of Hatha Yoga for beginners. If you are new to yoga practice then this is the pose you should definitely include in your daily yoga routine. Tree pose is considered a base pose from where all tree pose variations can be derived.
Tree pose (Vrksasana) is the first standing pose usually taught to beginners because it is the basic and simple pose to perform. Don’t lose your heart if you wobble or even fall when you first try to do this pose. You can take the help of a wall or even a chair to achieve your balance in this pose.
To balance on one foot, the practitioner needs to draw his attention towards his mind, body and breathing to remain strong and to maintain his balance in the pose. As you will achieve your balance on one foot, your self-confidence will grow and it will prepare your mind and body for more advanced Tree Pose Variations.
basic details:
| Sanskrit Name | Vrksasana |
| English Name | Tree Pose |
| Difficulty Level | Beginner |
| Type | Standing Pose |
Benefits to the following body parts:
- Hips
- Hamstrings
- Knees
- Quadriceps
- Gluteus
- Shoulders
- Arms
How to do Tree Pose (Vrksasana)
1. First stand in Tadasana Pose on your Yoga mat.
2. Now bend your right leg at your knee and place your right heel at the root of your left thigh.
3. Keep your foot resting on your left thigh your toes should be pointing downwards.
4. Balance your whole body weight on your left leg.
5. Now raise both of your arms over your head and join your palms.
6. Hold this pose for a few seconds with deep breathing. Now lower your arms and separate your palms.
7. Now bring down your right leg on the floor and stand again.
8. Now repeat this pose the other way around stand on your right leg and place the heel of your left leg at the root of your right thigh. The toes of your left leg should be facing downwards.
9. Raise your arms over your head and join your palms.
10. Balance your entire body weight on your right leg. You can hold this pose for the same time duration as the earlier position. Afterward, you can come back to Tadasana and relax.
Tree Pose Benefits
1. This pose tones and strengthens muscles of the legs, arms, shoulders, back, core, and back.
2. It also gives the practitioner a sense of balance and self-confidence.
3. It helps in a better posture that also leads to improvement in breathing.
4. Core becomes stronger.
5. This pose makes the joints of the hips, ankles, knee, and shoulders flexible that prepares the body for other difficult poses.
6. This pose involves most of the joints and muscles like the core, back, pelvis and chest; it makes the energy flow properly through them.
7. This is an excellent hip opener pose with the engagement of the pelvis, it regulates the functioning of the reproductive organs, thus helping women with infertility and hormonal issues.
Contraindications
Tree Pose can be difficult for many so proper care needs to be taken while doing the pose. Many precautions should be kept in mind when attempting to do this pose, which is explained below:
1. If the practitioner is suffering from any injury related to his joints or he has undergone any surgery then it is advisable that he should refrain from doing this pose.
2. This pose demands some basic strength, if the practitioner is having a weak body structure or his muscles are not strong enough or he is recovering from a long illness then the practitioner needs to be extra careful while attempting this pose.
3. A proper warm-up should be done before going for this pose and the beginners can take help of the wall or the chair to avoid falling.
4. This pose is a little more difficult than it looks. Beginners should follow the guidelines of their Yoga teacher and apart from balancing their body weight on one foot they should also be aware about their breathing patter to take maximum benefit from the pose.
How to do Tree Pose for Beginners
Do you find this pose difficult? Well! In that case, you can try these few exercises to prepare yourself for this pose.
As I said earlier that this pose is not as easy as it looks from the outside, but you need not worry. There are a few exercises that you can try, which will help you to perfect this pose in a short time.
First, try to balance yourself during the pose with the help of the wall. That will help you to get used to the leg movement and hold your entire body weight on one foot.
You can also try Supta Vrksasana.
Tree Pose Variations
1. Supta Vrksasana (Supine Tree Pose)

Steps for (Supine Tree Pose) Supta Vrksasana:
1. Lie down flat on your back on the yoga mat, keep your legs together and your arms by the sides of your body.
2. Now bend your right leg at your knees.
3. Place your foot on the inner left thigh at the root of your left thigh and take your arms over your head and join your palms together.
4. As per your capacity you can place your right foot at the root of your left inner thigh or your left calf.
5. Hold this position for about 15 to 30 seconds.
6. Repeat the above procedure with the other leg as well.
You can repeat the above procedure a few times with each leg. This will give you the strength and control needed for doing Tree Pose comfortably.
There is yet another modification you can do to Tree pose if you find it difficult to do and that is Tree Pose with foot on your calf.
2. Tree Pose foot on calf
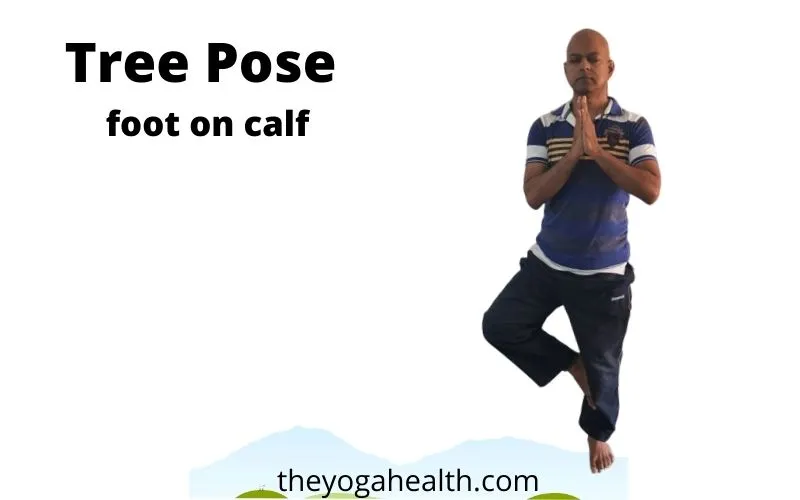
In this variation, you can balance yourself on one leg and place your other leg not on the inner thigh of your other leg as in the Tree Pose but on the calf of your other leg.
As you get comfortable in this pose you can slowly move your foot higher and higher in a few days, as your comfort and confidence in the pose grow.
Once you have perfected this basic Tree Pose then those who are interested in more difficult or advanced modifications can try various variations of Tree Pose.
When you are able to perform the basic Tree Pose then you can prepare yourself for more advanced variation to challenge yourself to become an expert in Yoga poses.
3. Bending Tree Pose

Steps for Bending Tree Pose
1. Stand in Tadasana on the floor.
2. Lift your right foot and place it on your left thigh.
3. Now lift your arms above your head.
4. Tilt your upper body towards your left side and bring down your left arm and place your left arm to rest on your right knee.
5. Now push your hips towards your left. This completes the pose.
6. You can hold this position for about 15 to 30 seconds.
7. Now return to the Tadasana and repeat the same with the other leg as described above.
4. Half Lotus Tree Pose

This is also another wonderful Tree Pose variation.
Steps for Half Lotus Tree Pose
1. Stand in the Tadasana pose, arms by your sides.
2. Lift your right foot and place it against your left thigh.
3. Breath in, and bring your hands up above your head.
4. Now push your right foot up, above your left thigh, and bring it into line with your left knee.
5. Bring your arms down and close your palms together with each other in the ‘Anjali Mudra’ Namaste Mudra.
6. You can hold this pose for about 30 seconds.
7. After that come back to the starting position and repeat the same with the other leg.
5. Holding foot from backside

You can also do variation in this pose by raising your hands. If your right leg is up and you are balancing yourself on your left leg, then bring your right hand down. Now hold your toes of the right leg with your right hand circling your right arm from the backside. As shown in the picture.
6. Adho Mukha Vrksasana

‘Adho Mukha’ means having a downward face and ‘Vrks’ means ‘tree’. This pose is also known as the full-arm balance in gymnastics.
Steps for Adho Mukha Vrksasana
1. Stand in Tadasana pose on your yoga mat. Now bend forward and place your palms fully on the floor about one foot away from the wall, keeping your arms fully stretched. The distance between your palms should be as much as between your shoulders.
2. Now take your legs back and bend your knees. Breath out, swing your legs up against the wall, and balance yourself.
3. The distance between the wall and that hands is if more than a foot then it will put more strain on the spine. It will also be more difficult to balance if hands are kept away from the wall.
4. Stay in this pose for about a minute with normal breathing.
5. After you have learned to balance yourself against the wall take your feet away from the wall. Then try to do the pose in the middle of the room. Keep your legs fully stretched and your toes pointing up, also lift your head as far as you can.
Benefits of Adho Mukha Vrksasana:
- This pose helps to develop your body harmoniously.
- It gives strength to the arms, wrist, and shoulders.
- This pose expands the chest fully.
Conclusion for tree pose variations:
This pose involves balance, stability, strength, stretch, awareness, and flow of energy in the body so correctly doing this pose is very important. To take full benefits out of the pose one must learn to do all Tree Pose variations. It can be difficult for some and quite easy for others so proper care needs to be taken to perform this pose correctly.
The importance of Tree Pose Variations can be judged from the fact that one can find many statues and pictures of Yogis standing in Vrksasana in the Hindu temples throughout the world. So who is your favourite Yogi standing in tree pose, who inspire you to perform this pose? Kindly mention so in the comments section below.
FAQs: Tree Pose
Q1. How to do tree pose?
Ans: The step-by-step instructions to perform the Tree Pose is given above in the article. Among the various variations of Tree Pose, you can choose as per your levels of Yoga practice and experience.
Q2. What muscles are used in Tree Pose?
Ans: Muscles of hips, hamstring, core, back, pelvis, knees, arms, shoulders, and chest are used in Tree pose.
Q3. How long tree pose should be done?
Ans: One can hold this pose for about 30 seconds but as per your capacity and experience, you can increase or decrease the time duration.
Share your experience of performing Tree Pose with other users and if you have any questions regarding this pose then you can ask in the comments section below.