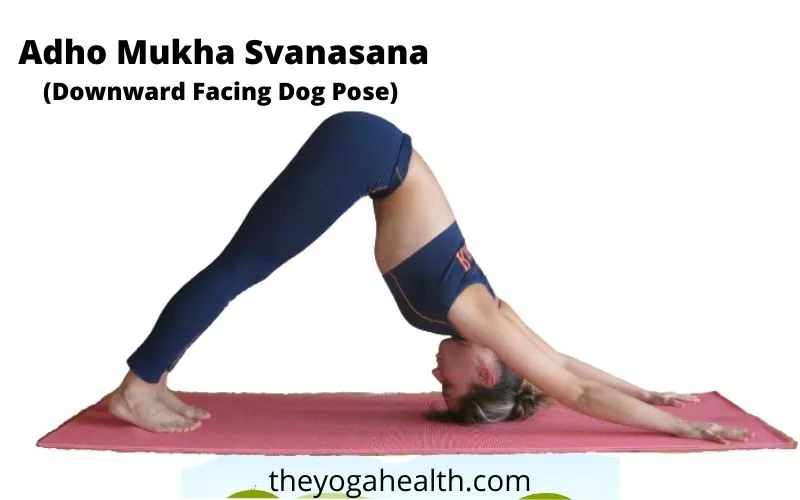
Adho Mukha Svanasana or the ‘Downward Facing Dog Pose’ is a very popular yoga pose. When you start yoga class, usually it is the first yoga pose to begin and also the last yoga poses to complete your class.
Although this yoga pose looks very easy to perform in reality it is a complex and not so easy yoga pose. It requires a lot of strength to correctly perform this yoga pose. It is also an important part of “Surya Namaskar Pose” and is a base pose for all Adho Mukha Svanasana variations.
Table of Contents
Downward Facing Dog Pose (Adho Mukha Svanasana)
‘Adho Mukha’ in the Sanskrit language means ‘having face downwards’ and ‘Savana’ means a ‘dog’. This pose resembles a dog that is stretching itself, keeping its head and forelegs down and the hind legs up, hence the name.
Adho Mukha Svanasana basic details
| Sanskrit Name | Adho Mukha Svanasana |
| English Name | Downward Facing Dog Pose |
| Difficulty Level | Beginner |
| Position | Prone |
Benefits to the following muscles:
- Biceps
- Triceps
- Arms
- Shoulders
- Lower Back
- Middle Back
- Upper Back
- Abs
- Feet
- Ankles
- Hamstrings
- Gluteus
- Pelvic
Story of a Dog from the Mahabharata
There are a lot of references and stories around dogs in the books of ancient India. One such story is mentioned in the Mahabharata.
According to the story after the Mahabharata war, the Pandavas decided to leave everything on earth and go to heaven. Yudhishtra the eldest brother of Pandavas led Bheema, Arjuna, Nakula, Sahdeva and Draupadi were on the way to heaven.
On the way a dog also accompanied them. The journey was very tough and they had to climb many mountains, ultimately only Yudhisthra and the dog managed to reach heaven and others collapsed on the way and failed to complete their journey.
On the gates of heaven, Indra appeared to take Yudhishtra to heaven, but Yudhisthra refused to go without the dog because he was touched by the loyalty of the dog. Indra did not want to allow the dog to enter heaven but eventually accepted Yudhisthra’s request.
How to do Downward Facing Dog Pose
First Variation for beginners:
1. Lie down on the floor on your stomach, your face downwards. Your legs should be about one foot apart.
2. Place your palms by the side of your chest, your fingers straight and pointing towards the direction of your head.
3. Breath out and raise your upper body (torso) from the floor. Straighten your arms and move your head inwards towards your feet.
4. Now let your head hang and shift your shoulder blades away from your ears.
5. Do not bend your knees, keep your legs stiff and press your heels down on the floor as far as you can.
6. Your feet should be parallel to each other and your toes should point straight ahead.
7. You can hold this pose for about a minute with deep breathing.
8. To come out of the pose, stretch your upper body (torso) forward and gently lower your body on the floor and relax.
Second Variation: for advanced practitioners:

- After point number 3 you can place your head on the floor, keeping your elbows straight and extending your back.
- Don’t bend your knees, keep your legs stiff and press your heels fully on the floor. Your heels and soles of your feet should rest fully on the floor.
- Your toes should point straight in front of you and your feet should be parallel to each other.
- Hold this pose for about one minute with deep breathing.
- To come out of the pose, breathe out and lift your head off the floor, stretch your upper body (torso) forward and gently lower your body on the floor and relax.
Benefits of Downward Facing Dog Pose
1. Energize
Whenever one is exhausted because of a heavy workout or any other reason, if he stays in this pose, it will remove fatigue and brings back the lost energy. The longer he stays in the pose the better it will be.
2. Good for Runners
This pose is especially recommended to the runners who get tired after a long hard race. With regular practice of this pose, they will also develop speed and lightness in their legs
3. Pain and stiffness
This pose relieves stiffness and pain in the heels and also helps in softening calcaneal spurs.
4. Strength
This pose gives strength to the ankles and keeps the legs shapely.
5. Arthritis
The regular practice of this pose helps in eradicating stiffness in and around shoulder blades. The arthritis of the shoulder joint is also relieved.
6. Abdominal muscles
This pose helps in drawing abdominal muscles towards the spine and strengthens them.
7. Heartbeat
In this pose, the diaphragm is lifted towards the chest cavity because of that the heartbeat is slowed down. This is an exhilarating pose.
8. Good for heart
Those who are not able to do Sirsasana can very easily do this pose and reap the many benefits of Sirsasana. As in this pose, the trunk is lowered and stretched bringing fresh blood in these parts without any strain on the heart.
9. Good for brain
This pose rejuvenates the brain cells and makes the brain stronger and sharper by relieving fatigue.
10. High blood pressure
Those suffering from high blood pressure can also do this pose without difficulty but people suffering from low blood pressure should avoid this pose.
Contraindications
1. Injury
Adho Mukha Svanasana should not be performed by a person who is having any Knee, Shoulder, wrist, ankle, hip, or spine injury.
2. Surgery
Those people who have undergone any recent surgery particularly related to hip, knee, shoulder, and spine area should also avoid this Pose.
3. Weak Body
People with weak body structure, having weak bones, shoulders, ankles, and wrists should avoid this pose.
4. Pregnant women
Pregnant women after the third trimester or after 28 weeks of pregnancy should avoid doing this pose.
Modifications
Those practitioners who are new to yoga poses and have not attained the full flexibility and strength to perform this pose can do it with a few modifications.
- The help of Yoga blocks can be taken to support wrists.
- If your back is weak or your hamstring muscles are not flexible enough to perform this yoga pose you can bend your knees, but remember to straighten your knees as you grow in practice.
- You can take the help of the wall for better grip and prevent yourself from falling.
Tips for the beginners
- One of the common mistakes the beginners do is that they don’t release their heels towards the floor. As they begin this pose on the balls of their feet, unless they take their weight back into the heels, it will never be a resting position.
- If in the beginning, the heels are not touching the floor, it’s ok, but you have to keep in mind to move in that direction otherwise the trajectory of the pose will remain forward instead of back.
- Keep your toes pointing in front of you and not sideways which is quite common among new practitioners.
- The distance between the feet should be hip-width apart and not more or less.
Conclusion for Downward Facing Dog Pose:
The Downward Facing Dog Pose (Adho Mukha Svanasana) is one of the basic and most widely recognized yoga poses. This pose can be practiced by any beginner and should be included in their daily yoga practice routine.
FAQs: Downward Facing Dog Pose
Q1. How to do adho mukha svanasana?
Ans: The step-by-step procedure to perform the Adho Mukha Svanasana is described above in the article.
As per your flexibility and body strength you can choose among the two variations described above.
Q2. Is Downward Dog good for you?
Ans: This pose is one of the fundamental and the most widely recognized yoga poses and has many benefits that are mentioned above in the article.
It stretches the muscles of hamstrings and calves and gives strength to arms, legs, shoulders, and abdominal muscles.
Q3. How to pronounce adho mukha svanasana?
Ans: The asana is pronounced as A-doh MOO-kah shvah-NAS-anna.
Q4. How much time for Downward facing dog pose?
Ans: Depending upon your age and body strength you can begin with 30 seconds and go up to a maximum of three minutes.
Although one minute time is sufficient for regular yoga practitioners to remain in this pose.
Share your experience of doing this asana and let us know if you have any questions or comments regarding this Pose in the comments section below.


