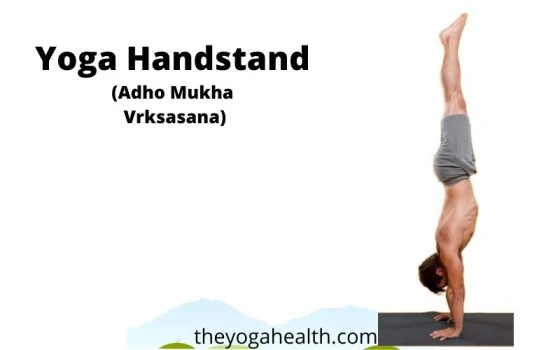
Yoga Handstand (Adho Mukha Vrksasana) is an advanced level Yoga pose, when you have progressed from beginner-level yoga to the intermediate stage, it’s likely that you’re interested in expanding your practice with advanced yoga.
One particular pose that presents a significant challenge and demands strength, flexibility, and balance is the handstand. Here is everything you need to know to master the Adho Mukha Vrkasasana, also known as the handstand.
Table of Contents
Yoga Handstand (Adho Mukha Vrksasana)
The name “Adho Mukha Vrksasana” is derived from the three Sanskrit language words: “Adho” which means down, “Mukha” which means face, and “Vrksa” which means tree.
In this yoga Pose, the body is positioned upside down, and instead of relying on the legs for support, the balance is maintained using the arms and wrists. This posture allows you to face downward while inverting your body.
The Adho Muka Vraksana, also known as the Urdhva Mukha Vrksasana, is a challenging pose in the arm balance sequence that requires both physical and mental engagement. It calls for strong arms, shoulders, and core muscles to lift the hips and elevate the body.
However, the key aspect of this practice is conquering the fear of falling. For beginners, it is recommended to begin with ‘Ardha Adho Mukha Vrksasana’, also known as the ‘half handstand pose’, while using some kind of support.
Basic details:
| Sanskrit Name | Adho Mukha Vrksasana |
| English Name | Handstand |
| Difficulty Level | Advanced |
| Position | Upside Down |
Overview of Yoga Handstand (Adho Mukha Vrksasana)
The key aspect of Handstand is conquering the fear of falling. For beginners, it is recommended to begin with ‘Ardha Adho Mukha Vrksasana’, also known as the ‘half handstand pose’, while using some kind of support.
This variation helps to build confidence and allows the body to become familiar with aligning the hips on the shoulders and wrists. Once comfortable with this variation, practitioners can progress to the full handstand pose.
Regardless of the variations, performing this pose requires significant focus and concentration.
Once you gain confidence and practice regularly, you can experience a sense of calmness. This pose serves as a foundation for various other yoga variations and is commonly incorporated into yoga sequences. It revitalizes the body, infusing it with energy and vitality.
Preparations for doing this pose
Ideally, it is recommended to practice this pose in the morning, approximately 10 to 12 hours after having a meal. This timing allows you to have sufficient strength and energy to perform it effectively.
However, if morning practice is not feasible, wait for a gap of 4 to 6 hours after having meals before attempting this asana.
Before practicing this pose, ensure that your bladder and bowels are empty and clean.
To prevent injuries, it is important to engage in proper warm-up exercises before attempting the pose. These warm-up exercises help prepare your body and minimize the risk of injury.
Safety and Precautions
If your doctor has advised against situations where your head goes below the level of your heart, such as uncontrolled high blood pressure, stroke, detached retina, glaucoma, or recent dental bone transplants, it is important to avoid Handstand and other inversions.
Similarly, if you have any injuries or chronic pain in your neck, shoulder, or wrist, it’s best to refrain from attempting this pose.
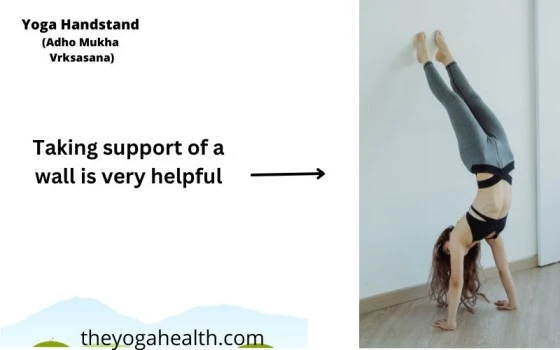
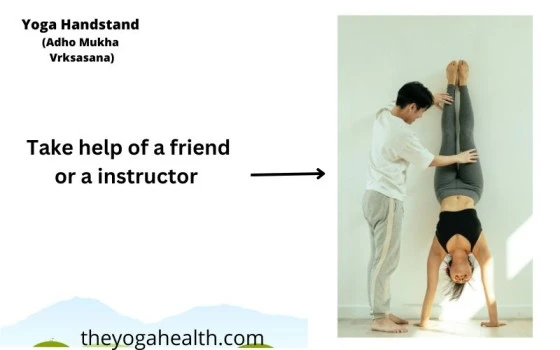
When practicing Handstand, it is recommended to start by using a wall for support or have a friend or instructor assist you. This ensures safety and support until you become proficient in the pose.
Preparatory Poses
To perform this pose effectively and without any difficulties, it is important to warm up and engage in specific yoga poses that prepare the body for inversions.
Here are some recommended poses for beginners practicing handstand:
Plank Pose:
This pose strengthens the wrists and shoulders, preparing them for the demands of handstand.
Downward Facing Dog Pose:
This pose helps to warm up the body and prepares it for the transition into a hop or headstand. It also promotes proper body alignment.
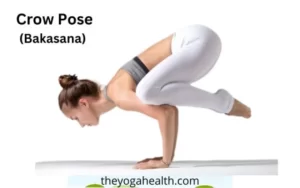
Crane Pose:
Crane pose helps in building upper body strength, which is essential for maintaining balance in handstand.
Eka Pada Adho Mukha Vrksasana:
This pose helps to overcome the fear of falling and develops confidence. It is a variation of headstand that teaches how to engage the core in an inverted position.
Wheel Pose:
Wheel pose strengthens the wrists, which can be beneficial in case of a fall during handstand practice.
By incorporating these poses into your warm-up routine, you can enhance your preparation for handstand and improve your overall performance.
How to do a Handstand
To perform this pose, follow these steps:
- Start in Tadasana (Mountain Pose) facing a wall. Get down on all fours, ensuring that you are one hand’s length away from the wall. Place your palms on the ground, shoulder-width apart, and fully stretch out your arms.
- Position your hands with the middle finger facing the wall, while the rest of your fingers are extended.
- Move your legs back to about halfway across the yoga mat, resembling the downward dog pose. Your feet should be close to your hands, approximately one meter away. Kick one leg up, followed by the other, using the wall for support to practice balance.
- Once you feel confident, gradually move one foot away from the wall, and then the other. After practicing this, attempt the handstand away from the wall, preferably at the center of the room.
- During the yoga handstand, remember to keep your legs and arms straight, toes pointed upward, and your neck and head relaxed.
- To come out from this position, breathe slowly and deeply. Lower one limb at a time back to the downward dog pose, and then return to Tadasana.
- By following these instructions, you can safely practice and gradually improve your handstand. Remember to maintain proper form and listen to your body throughout the process.
Modifications and Variations
There are various approaches to practice getting into Handstand, whether using a wall or attempting it away from the wall.
Many people find a sense of comfort when working with a wall’s support to be crucial, especially when conquering the fear of falling, which can be a main obstacle in their progress.
First method
One method is to perform a two-legged jump into the pose. After following step 2 mentioned earlier, bend both knees and lightly jump, bringing your buttocks to the wall. Straighten your legs once you’re in the position.
To prepare for this entry, you can try donkey kicks with both legs, jumping up and aiming to tap your buttocks with your heels.
If you’re ready to work on holding the pose in the center of the room, there are a few other kicking-up methods you may want to explore:
Second method
Begin in the standing split position. Place your palms flat on the floor and bend your standing leg. Lightly hop, bringing both legs up. It may be helpful to bend your lifted leg as you jump. It’s alright if your first leg goes slightly beyond the vertical position, either straight or bent.
This can aid in finding your balance. Once you are stable on your hands, focus on bringing both legs up straight.
Third method
Begin in Prasarita Padottanasana (wide-legged forward bend). Straighten your arms while in the forward bend position. Shift your weight forward onto your hands. Try lifting both legs out to the sides and up simultaneously, maintaining control.
Your shoulders may extend past your wrists as you lift up, which is acceptable, but remember to realign them once you are in the pose.
By experimenting with these different methods, you can develop your Handstand practice while finding the approach that works best for you. Keep in mind to practice slowly and pay attention to your body as you go.
How to do a handstand for beginners
For beginners, maintaining straight elbows during handstand practice can be challenging. If you’re facing this difficulty, you can use a strap with a buckle to assist you.
Straighten your arms, wrap the strap around them slightly above the elbows, and then tighten it to make sure it fits comfortably. Once in the pose, try pushing your arms away while maintaining the strap’s support.
While it’s important to strive for proper technique when learning Handstand, it’s not essential to achieve a perfect execution in order to reap its benefits. Don’t worry if you are unable to move away from the wall; you can still gain advantages from practicing the inversion!
Common Mistakes
When lifting your leg to go into Handstand, it’s important to keep your hips square and avoid rotating the raised leg. Rotating the leg can shift your center of gravity and make it challenging to maintain balance in the pose.
As a beginner, it’s common to have the tendency to kick up too quickly, which can disrupt your balance. Remember to take it slow, as Handstand is more about control and proper alignment than speed.
Some individuals may find their elbows bending as they kick up, but it’s crucial to keep your arms straight and stable since they serve as the foundation for the pose. Focus your gaze between your hands, rather than looking behind you, to maintain stability and alignment.
Yoga Handstand Benefits
1. Enhances Breathing Capacity:
Handstand fully expands the chest, helping to boost breathing capacity and promote deep, conscious breathing.
2. Strengthens Upper Body Muscles:
You can build up the muscles in your hands, arms, wrists, and shoulders by performing this asana, which will strengthen your upper body.
3. Stretches Abdominal Muscles and Aids Digestion:
This pose stretches the abdominal muscles, stimulating digestion and promoting a healthy digestive system.
4. Improves Balance and Coordination:
Regularly practicing this asana can enhance your overall balance and coordination, as it requires focus and stability to maintain the pose.
5. Enhances Cardiovascular Endurance:
Performing the this asana can improve cardiovascular endurance and activate the baroreceptors in the carotid arteries, contributing to a healthy cardiovascular system.
6. Promotes Mental Calmness and Reduces Stress:
Handstands have a relaxing impact on the mind, which lowers stress and enhances mental health. It can also alleviate symptoms of depression.
7. Relieves Headaches and Lowers Blood Pressure:
This pose can provide relief from headaches and help lower blood pressure in the arteries, promoting better overall health.
8. Increases Shoulder Joint Flexibility:
Regular practice of the this asana can lead to increased flexibility and a wider range of motion in the shoulder joints, improving overall joint health.
You can enjoy all of these advantages, enhancing your physical and emotional well-being, by including the handstand in your regular yoga practice.
Contraindications
Precautions for Beginners
1. Pregnant Women:
Pregnant women should avoid performing the handstand pose due to the inversion and the added weight in the uterus and abdomen, which can make breathing difficult. It’s important to prioritize the safety and well-being of both the mother and the baby.
2. High Blood Pressure and Heart Issues:
People who have heart issues or high blood pressure should contact their doctor before attempting the handstand pose. Students with low blood pressure should practice at home under the guidance of experienced yoga teachers to prevent potential dizziness.
3. Shoulder and Wrist Injuries:
Before trying a handstand, those who have had shoulder or wrist injuries should wait until they are completely recovered. They can explore variations of the pose and gradually assess if the upper body can bear the weight.
Seeking the approval of a healthcare professional is advisable for individuals who have undergone internal organ surgery.
4. Back Problems:
Individuals with back problems should avoid practicing handstands, as the pose can potentially aggravate their condition. It’s important to prioritize the health and well-being of the spine by engaging in suitable exercises recommended by healthcare professionals.
You may assure a secure and enjoyable yoga practice while lowering the possibility of injury by being aware of these safety measures and respecting the limitations of your body.
Conclusion for Yoga Handstand
The yoga handstand (Adho Mukha Vrksasana) is a challenging pose that offers a multitude of physical and mental benefits. By incorporating this pose into your yoga practice, you can experience enhanced breathing capacity, strengthened upper body muscles, improved digestion, and increased balance and coordination.
Moreover, the this yoga pose promotes cardiovascular endurance, mental calmness, and stress reduction, while also providing relief from headaches and lowering blood pressure.
Remember, the journey towards mastering the this yoga pose is a gradual process that requires patience, practice, and proper technique. Prioritize your well-being by seeking guidance from healthcare professionals and experienced yoga teachers.
Listen to your body as you set out on your trip, be mindful of its limitations, and put safety first. Embrace the joy of progress, whether you choose to practice against a wall or challenge yourself away from it.
Discover the transforming effects this yoga Pose may have on your physical and mental well-being as you unlock its potential. Embrace the balance, strength, and inner calm that this pose can bring to your yoga practice and beyond.
Remember, it is always recommended to consult with a qualified yoga instructor or healthcare professional before attempting advanced poses like this yoga Pose. They can provide personalized guidance and support to ensure safe and effective practice.
FAQs – Yoga Handstand
Q1. Is the handstand suitable for beginners?
Ans. This yoga Pose is considered an advanced pose that requires strength, balance, and proper technique.
It is recommended for individuals with some experience in yoga and a solid foundation of upper body strength.
Beginners are advised to start with preparatory poses and seek guidance from experienced yoga teachers before attempting this Pose.
Q2. Can pregnant women practice the handstand?
Ans. Pregnant women are generally advised to avoid inversions, including this Pose, due to the increased strain on the abdominal muscles and potential restriction of blood flow.
During pregnancy of the yoga practitioner, it is important to put the safety and wellbeing of the mother and the unborn child first.
Q3. What are some preparatory poses to build strength for the handstand?
Ans. Preparatory poses such as plank pose, downward dog, dolphin pose, and core-strengthening exercises can help build the necessary strength and stability required for this Pose.
These poses can be practiced regularly to develop the foundational strength for a successful practice.
Q4. Can I practice the handstand if I have a fear of falling?
Ans. The fear of falling is common when learning the this pose. It is important to progress at your own pace and gradually build confidence.
Starting with practicing against a wall or with the assistance of a friend or instructor can help alleviate fear and provide support during the learning process.
Q5. What if I have wrist or shoulder pain during the handstand?
Ans. Wrist and shoulder discomfort can occur during this Pose, especially if proper alignment and technique are not maintained.
It is very essential to listen to your body and avoid pushing despite pain.
Strengthening the wrists and shoulders through targeted exercises and modifying the pose with the guidance of an yoga professional can help alleviate pain and prevent further injury.
Q6. Can the handstand help improve my overall balance and core strength?
Ans. Yes, it is an excellent pose for improving balance, coordination, and core strength.
Maintaining stability while inverted requires engaging the core muscles and refining body awareness.
Regular practice of the this pose can contribute to improved overall balance and core strength over time.
Share your experience of doing this yoga Pose and if you have any questions or comments regarding this Post you can ask in the comments section below.